Sometimes we find ourselves in a position where we wish someone could take a picture of us or our friends, the iPhone camera timer is there to be that someone. You can squeeze into a group photo, and take high-definition photos in low light if you can learn how to set up an iPhone photo timer.
Take a perfect shot while setting a time delay of your choosing. Capture your best moments by remotely triggering your timer photo iPhone either front or rear. A rear camera captures more light and details than the front one.
In this blog, we will discuss multiple ways, step-by-step, to make sure you get the best iPhone picture with timer and never miss out on your adventures.
How to set Timer on iPhone camera?
Here is how you can take a perfect iPhone picture with timer:
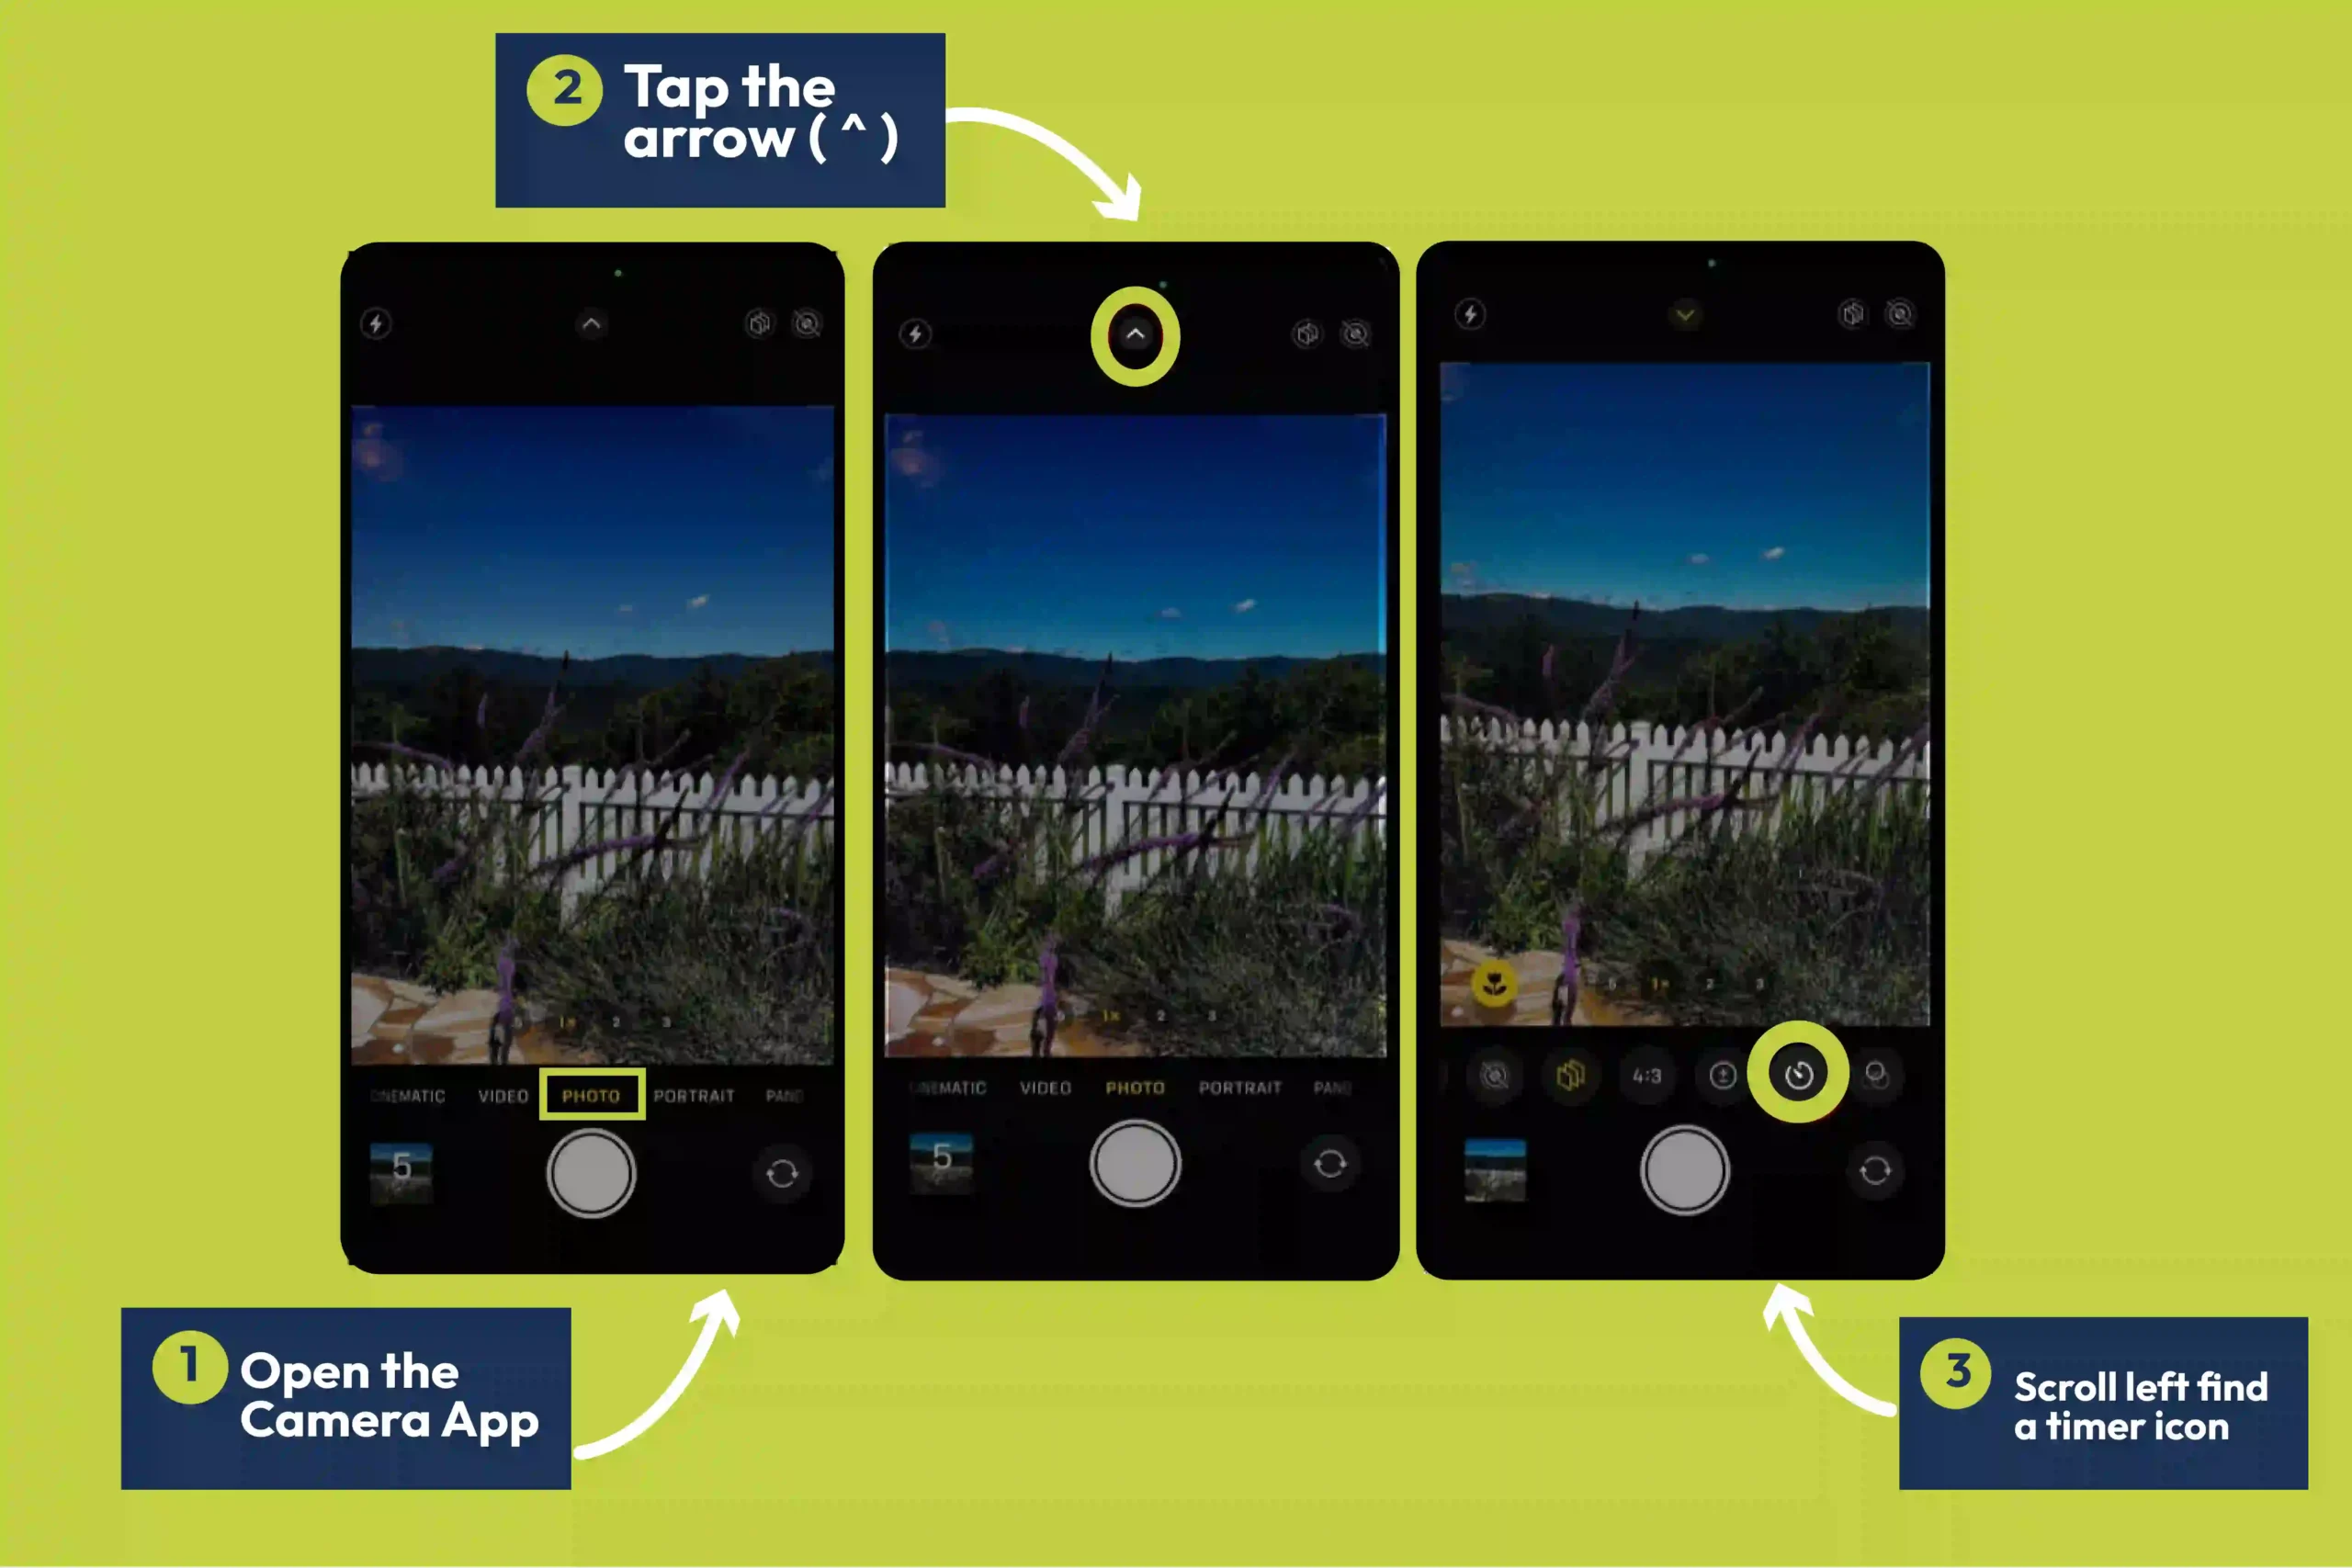
1.Open the Camera App and set up your shot. Adjust yourself or move things in your frame. 2.Tap the arrow ( ^ ) facing upward in the middle of your screen to bring out the menu. 3.Scroll left find a timer icon from the options, and tap on it.
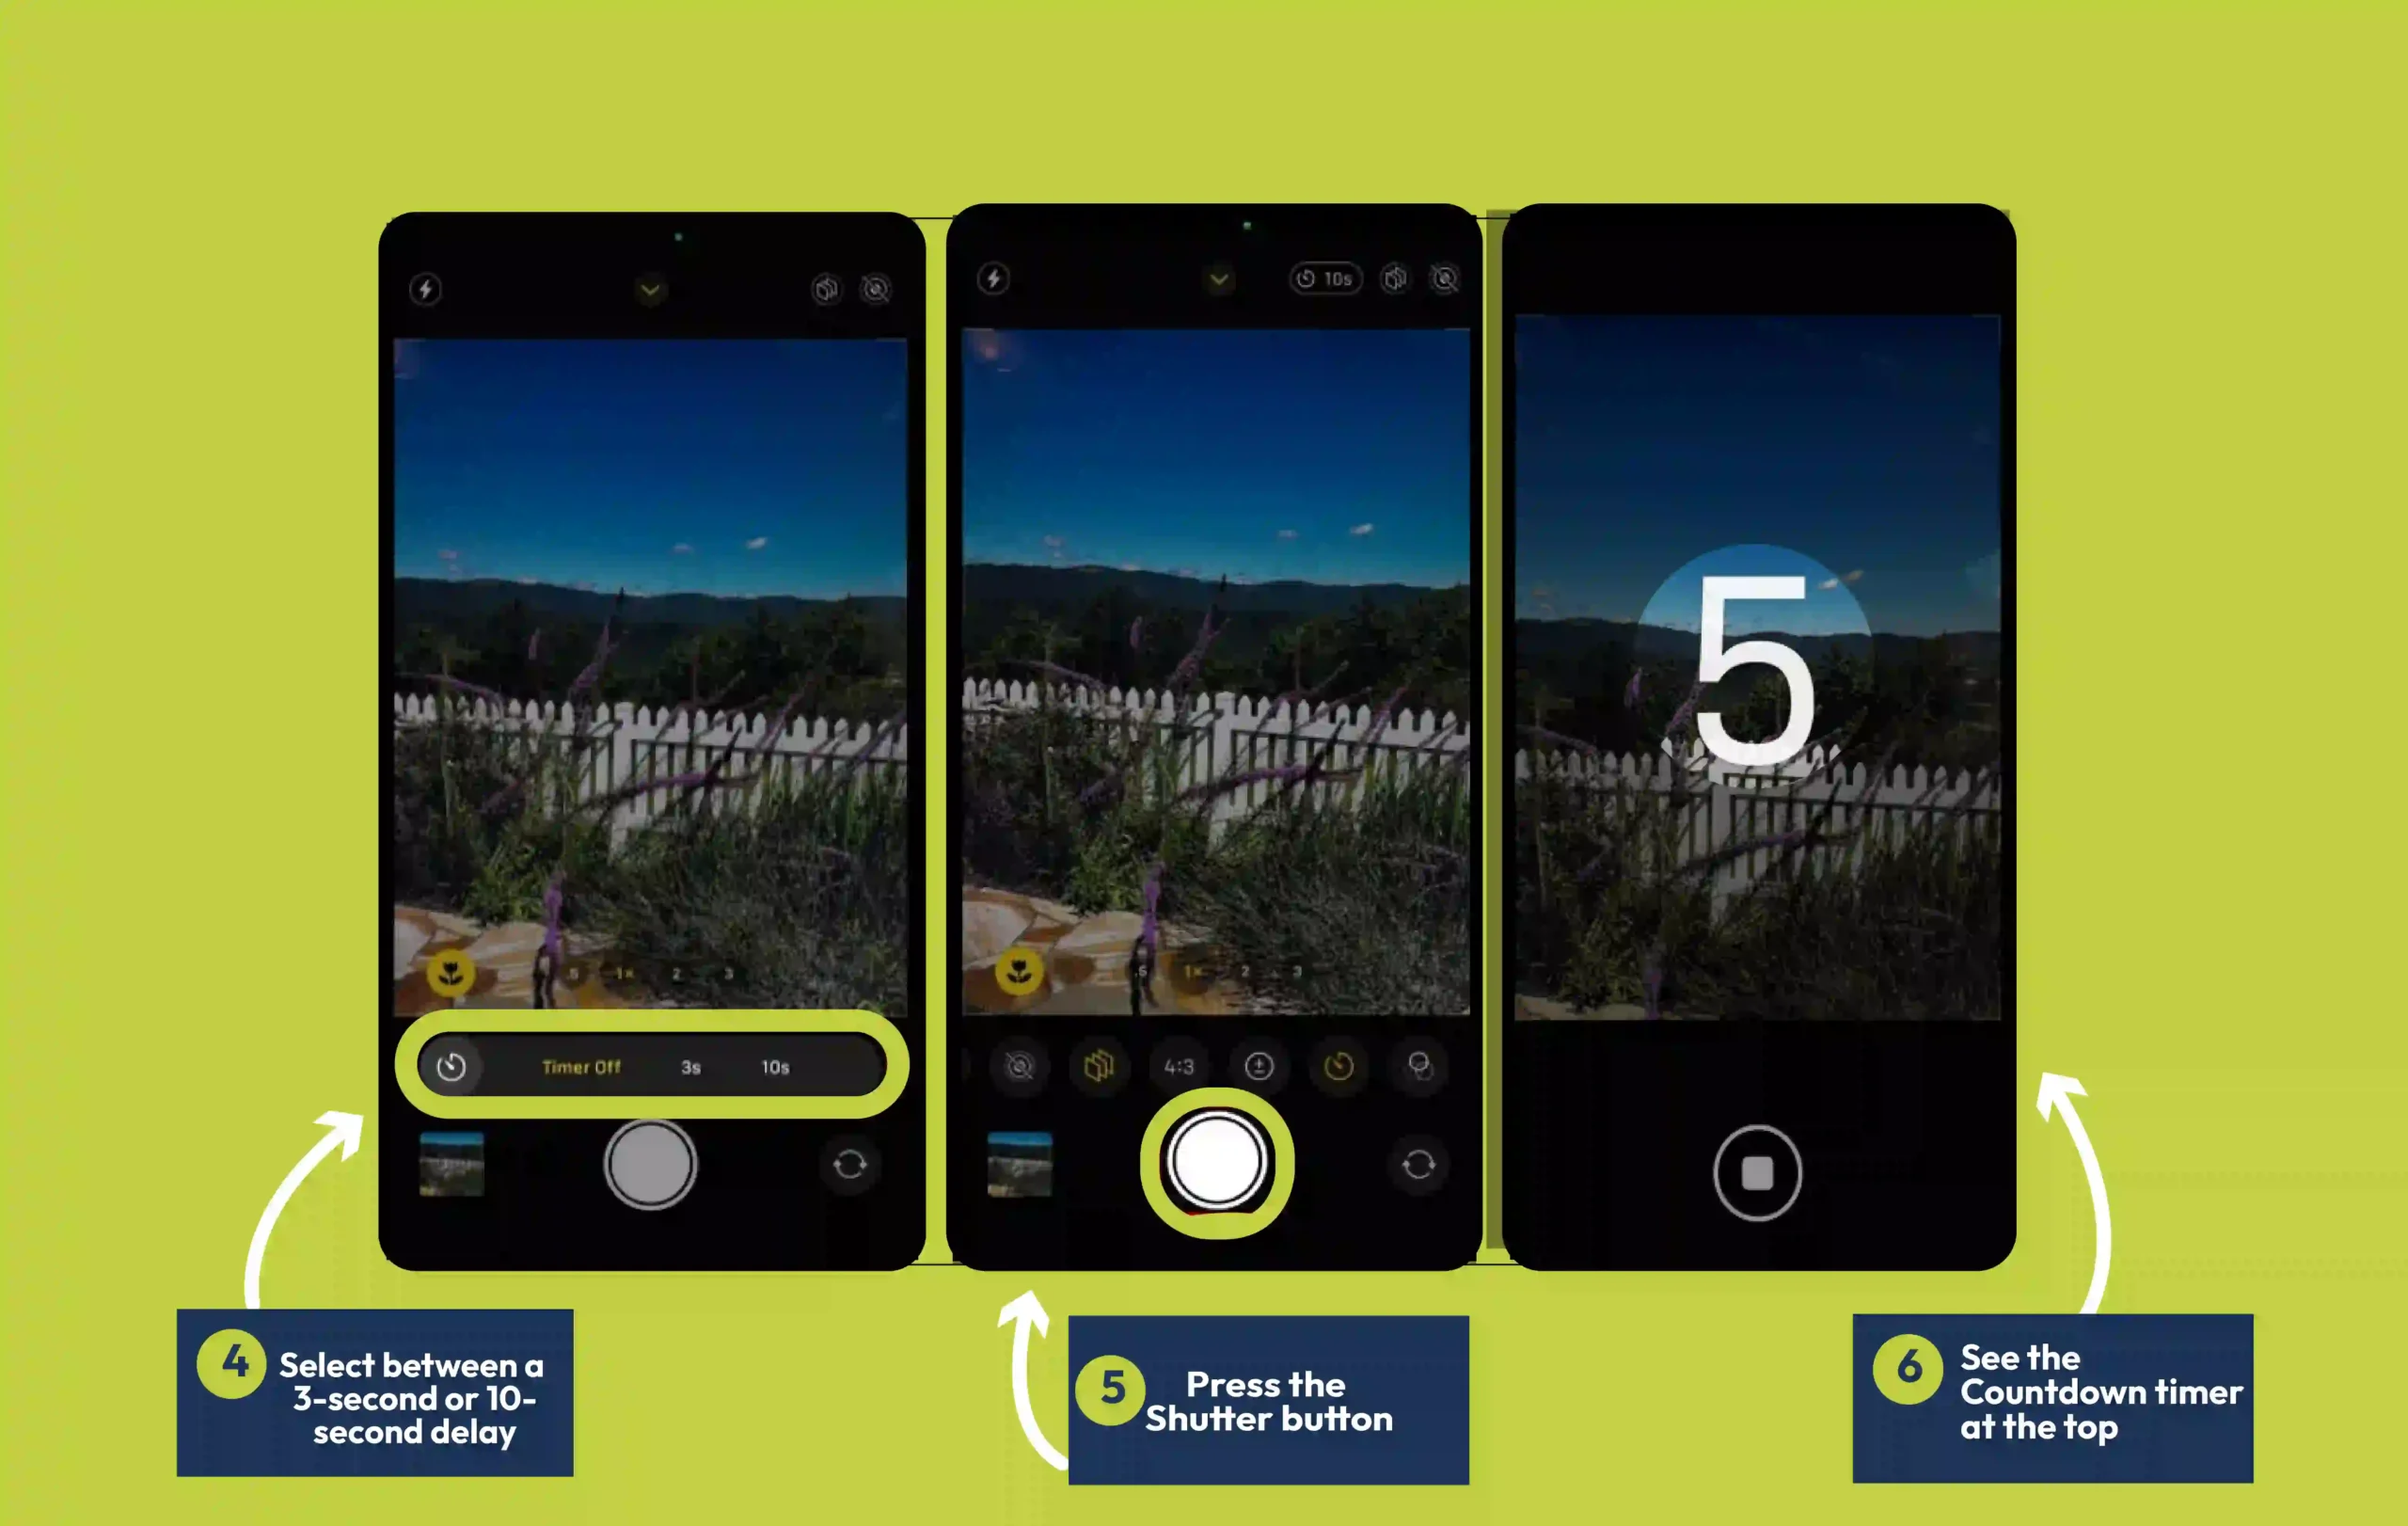
4.You will see a timer-off button. Select between a 3-second or 10-second delay. 5.The Apple camera timer icon on iPhone will turn yellow/orange, and you can see the countdown timer at the top of your screen. 6.When you are ready for your shot, press the shutter button and the countdown will start (the camera flash will flicker as it countdowns). 7.When the iPhone camera countdown reaches ‘1’, the shutter goes off and takes your photo. Self-timer for iPhone is available only for Photos and Portrait mode. Apple timer iPhone camera doesn’t provide this functionality for videos because video recordings can be cropped/trimmed from the beginning.
Self-timer for iPhone is available only for Photos and Portrait mode. Apple timer iPhone camera doesn’t provide this functionality for videos because video recordings can be cropped/trimmed from the beginning.
Pro tips to capture shots using iPhone Camera timer
The following tips can help you improve your shots, teaching you pro ways how to take a timed photo on iPhone
Using a Tripod for iPhone:
Taking photos on an iPhone Tripod and mount can be super helpful and creative, especially with a set timer. Make sure your tripod is set at an eye level to capture different angles. The obvious and most helpful reason is that it avoids blurriness caused by shaking hands. Get a more stable base with a tripod and capture more sharp & detailed photos Adjust your iPhone phone tripod, to best capture group activities, landscapes, and horizons. The shutter remains open longer, allowing more light and details into its frame for low-right and night images.
Camera framing:
Position your camera and the subjects in your frame very carefully. If there is a bright object like a bulb or Sun, face your camera the other way or sideways to avoid glaring. This can help avoid ruining your favorite shots when on a timer.
Good framing can draw attention to your context by getting more camera exposure and depth to your photo ideas. If you need more customization, go to iPhone camera filters to refine your frame regardless of the environment.
Live Photos Feature:
Apple iPhone timer camera introduces another amazing feature called the live photos feature that can capture 1.5 seconds before and after the image is taken. How cool is that ! Now you can drag back and forth to keep the exact frame you like. Add sound and motion to your photos to make them more realistic and captivating.
You can even capture surprising or unexpected moments that could happen right before taking a picture. Like your friend falling, fireworks, a shooting star, or sincere reactions. Edit live photos iPhone to create GIFs, shorts, or clips of your exciting moments and save them on your system.
However, doing so takes up more space on your phone than a single shot.
Switch off live photoiPhone by opening the Camera App. Tap on its double-circle icon with dotted borders. The feature will get crossed off by saying “Live Off” and you can turn it back on by tapping it again
Burst Mode:
iPhone burst mode timer is usually ON by default (if “Live Photos” is off). You can get 10 photos snapped every time the shutter goes off. Leverage this feature to remove any unwanted poses like closed eyes, or blurry movements.
After capturing, you can freely edit and decide what frames you want to keep by tapping them. A pop-up appears saying “Keep only # Favorites” (‘#’ is the number of photos you tapped) or “Keep Everything”.
This is to ask whether you would like to keep your selected photos or all of the photos.
iPhone timer burst is a great option for capturing action shots, such as sports, jumping, riding, or driving cars, without pressing the shutter multiple times.
How to set a timer on iPhone camera for Video Recordings?
Utilizing your Shortcuts can expand your experience on the iPhone. We can set up an iPhone video timer to delay your video recordings using this simple shortcut. Just follow this step-by-step method:
1.Open the Shortcuts App 2.Add actions as described below. 3.Install the free iPhone Video Timer from the Shortcuts library (if not already available) 4.Add the shortcut to your home screen or in your shortcuts menu 5.Enter the number of seconds to delay your video recording 6.White flash blinkers once, to indicate the start of recording.
Time-lapse Camera for iPhone
You can also go for an amazing option of time lapse video iPhone. iPhones capture delayed videos by clicking photos after every few seconds. This creates a collection of photos merged into a video that compresses duration and playtime speed as it sees fit.
Here is how you can turn video into time lapse iPhone:
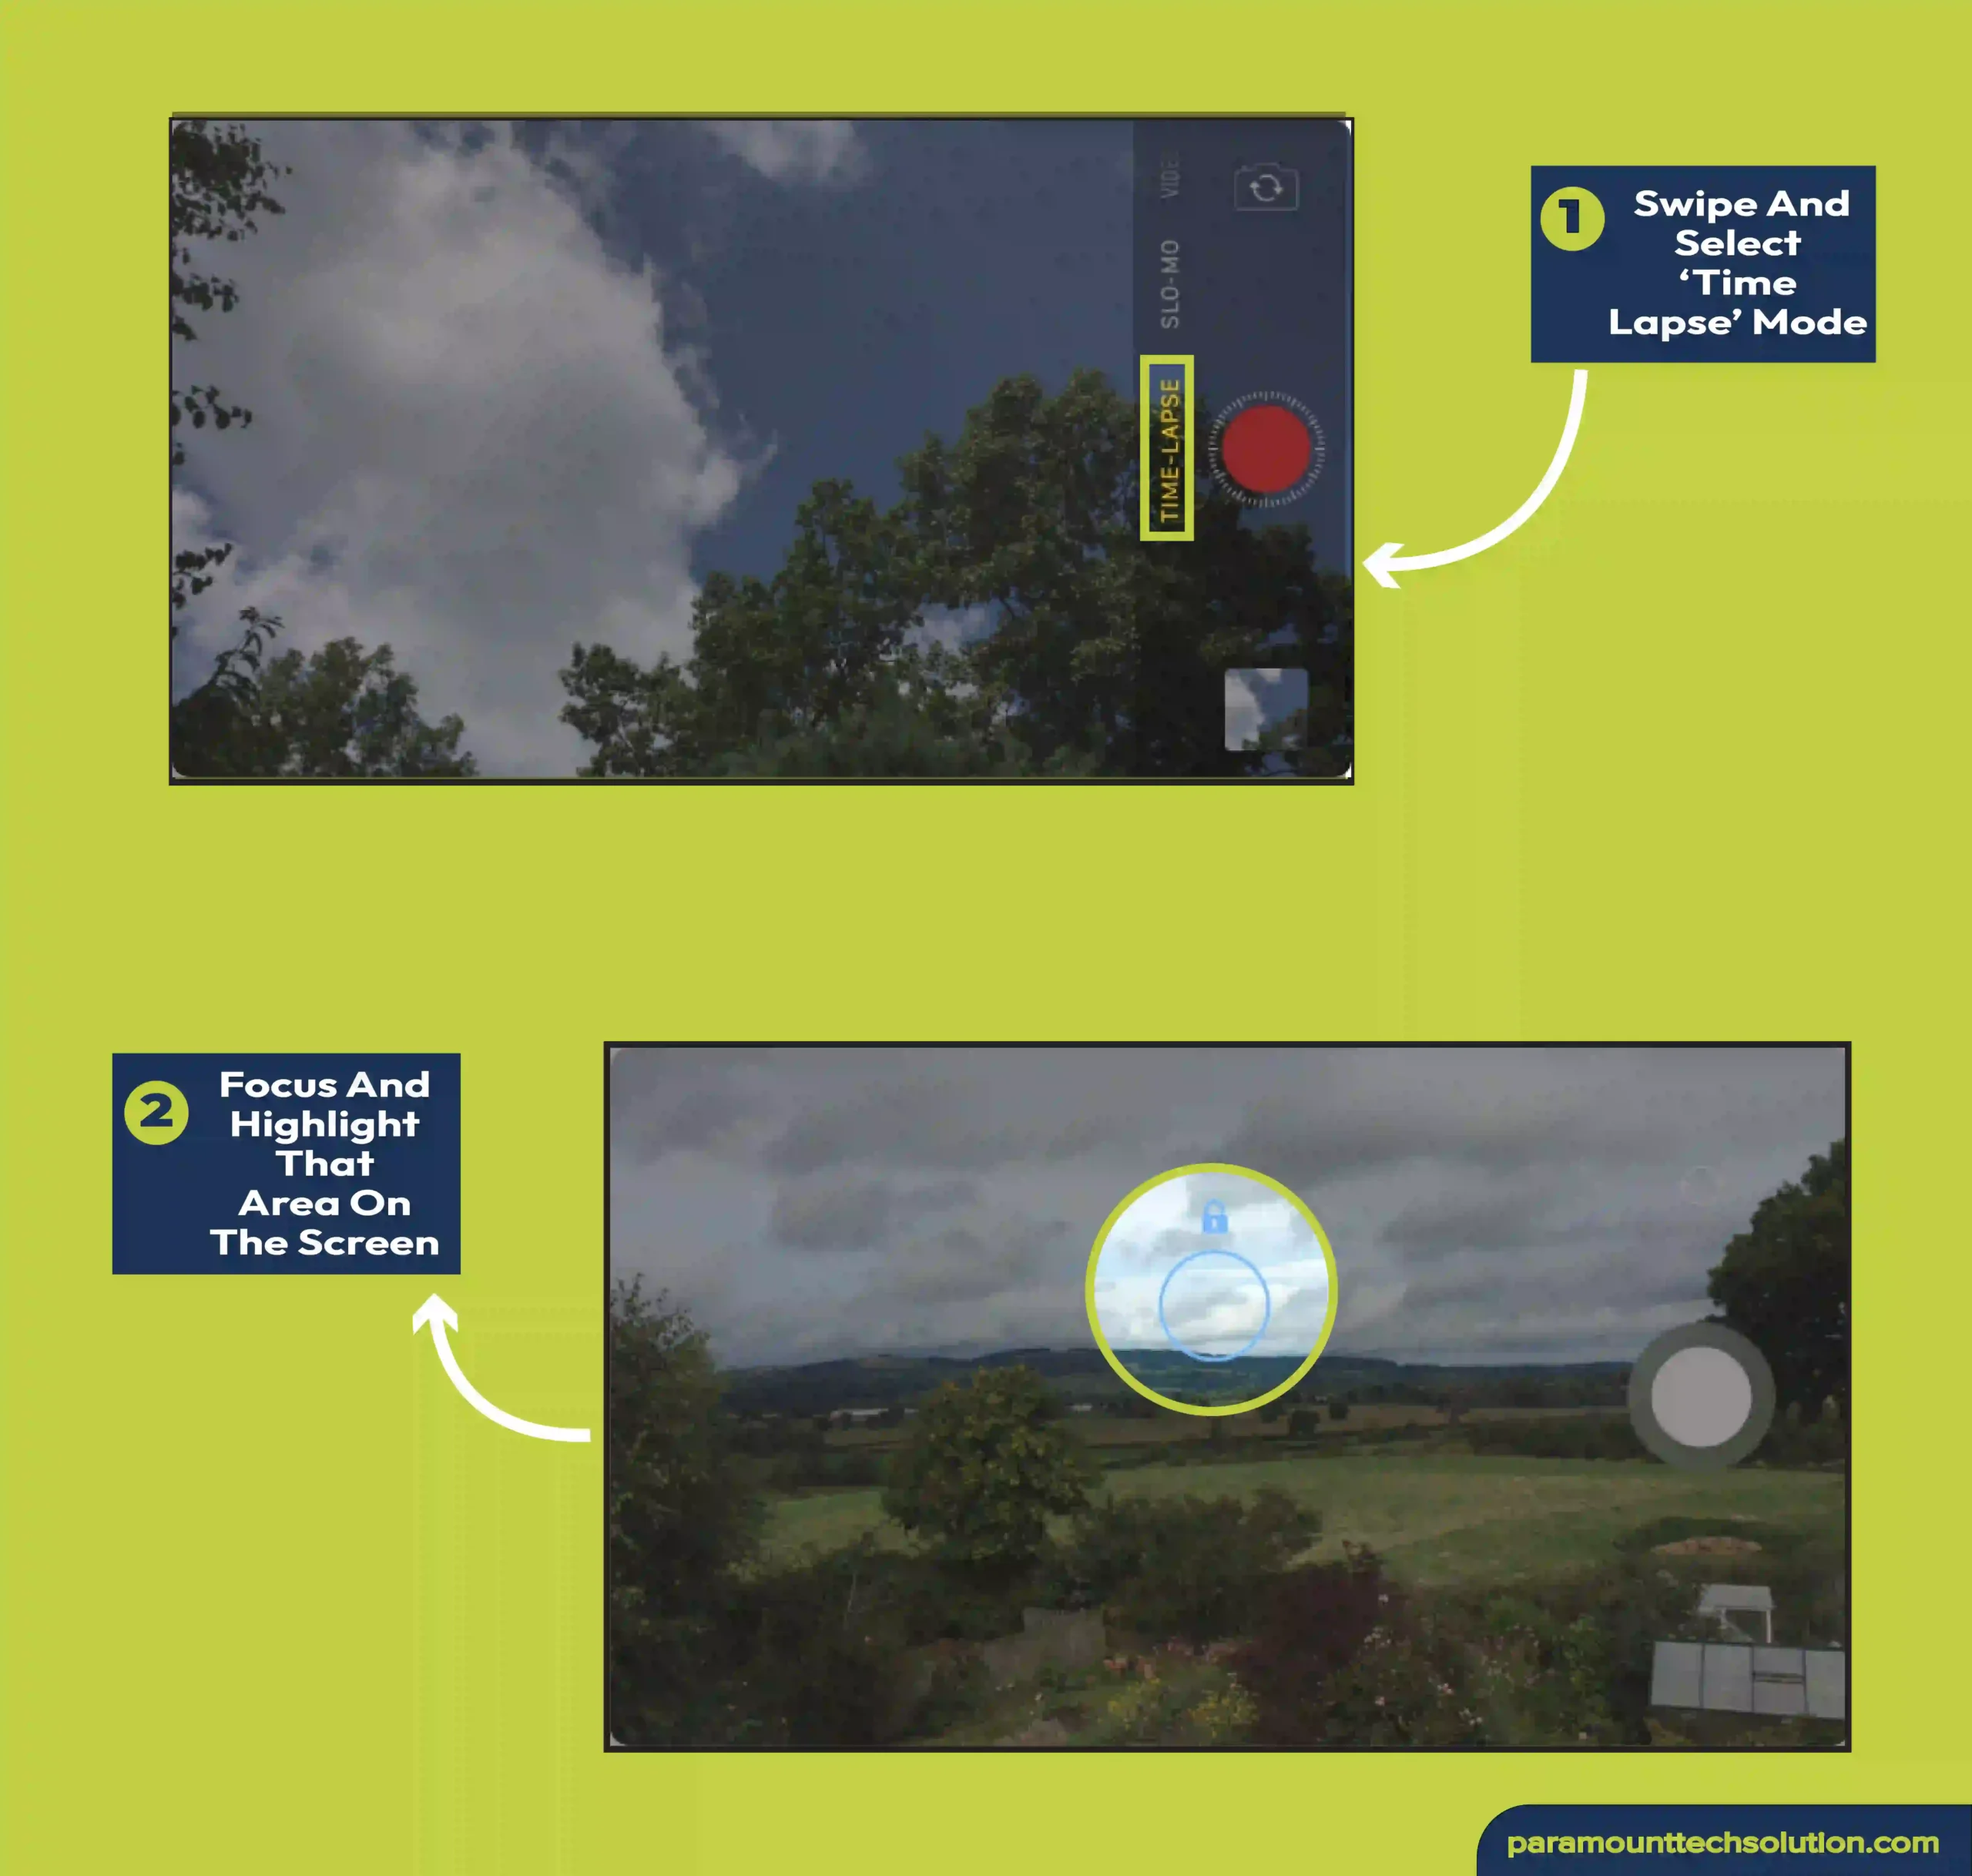
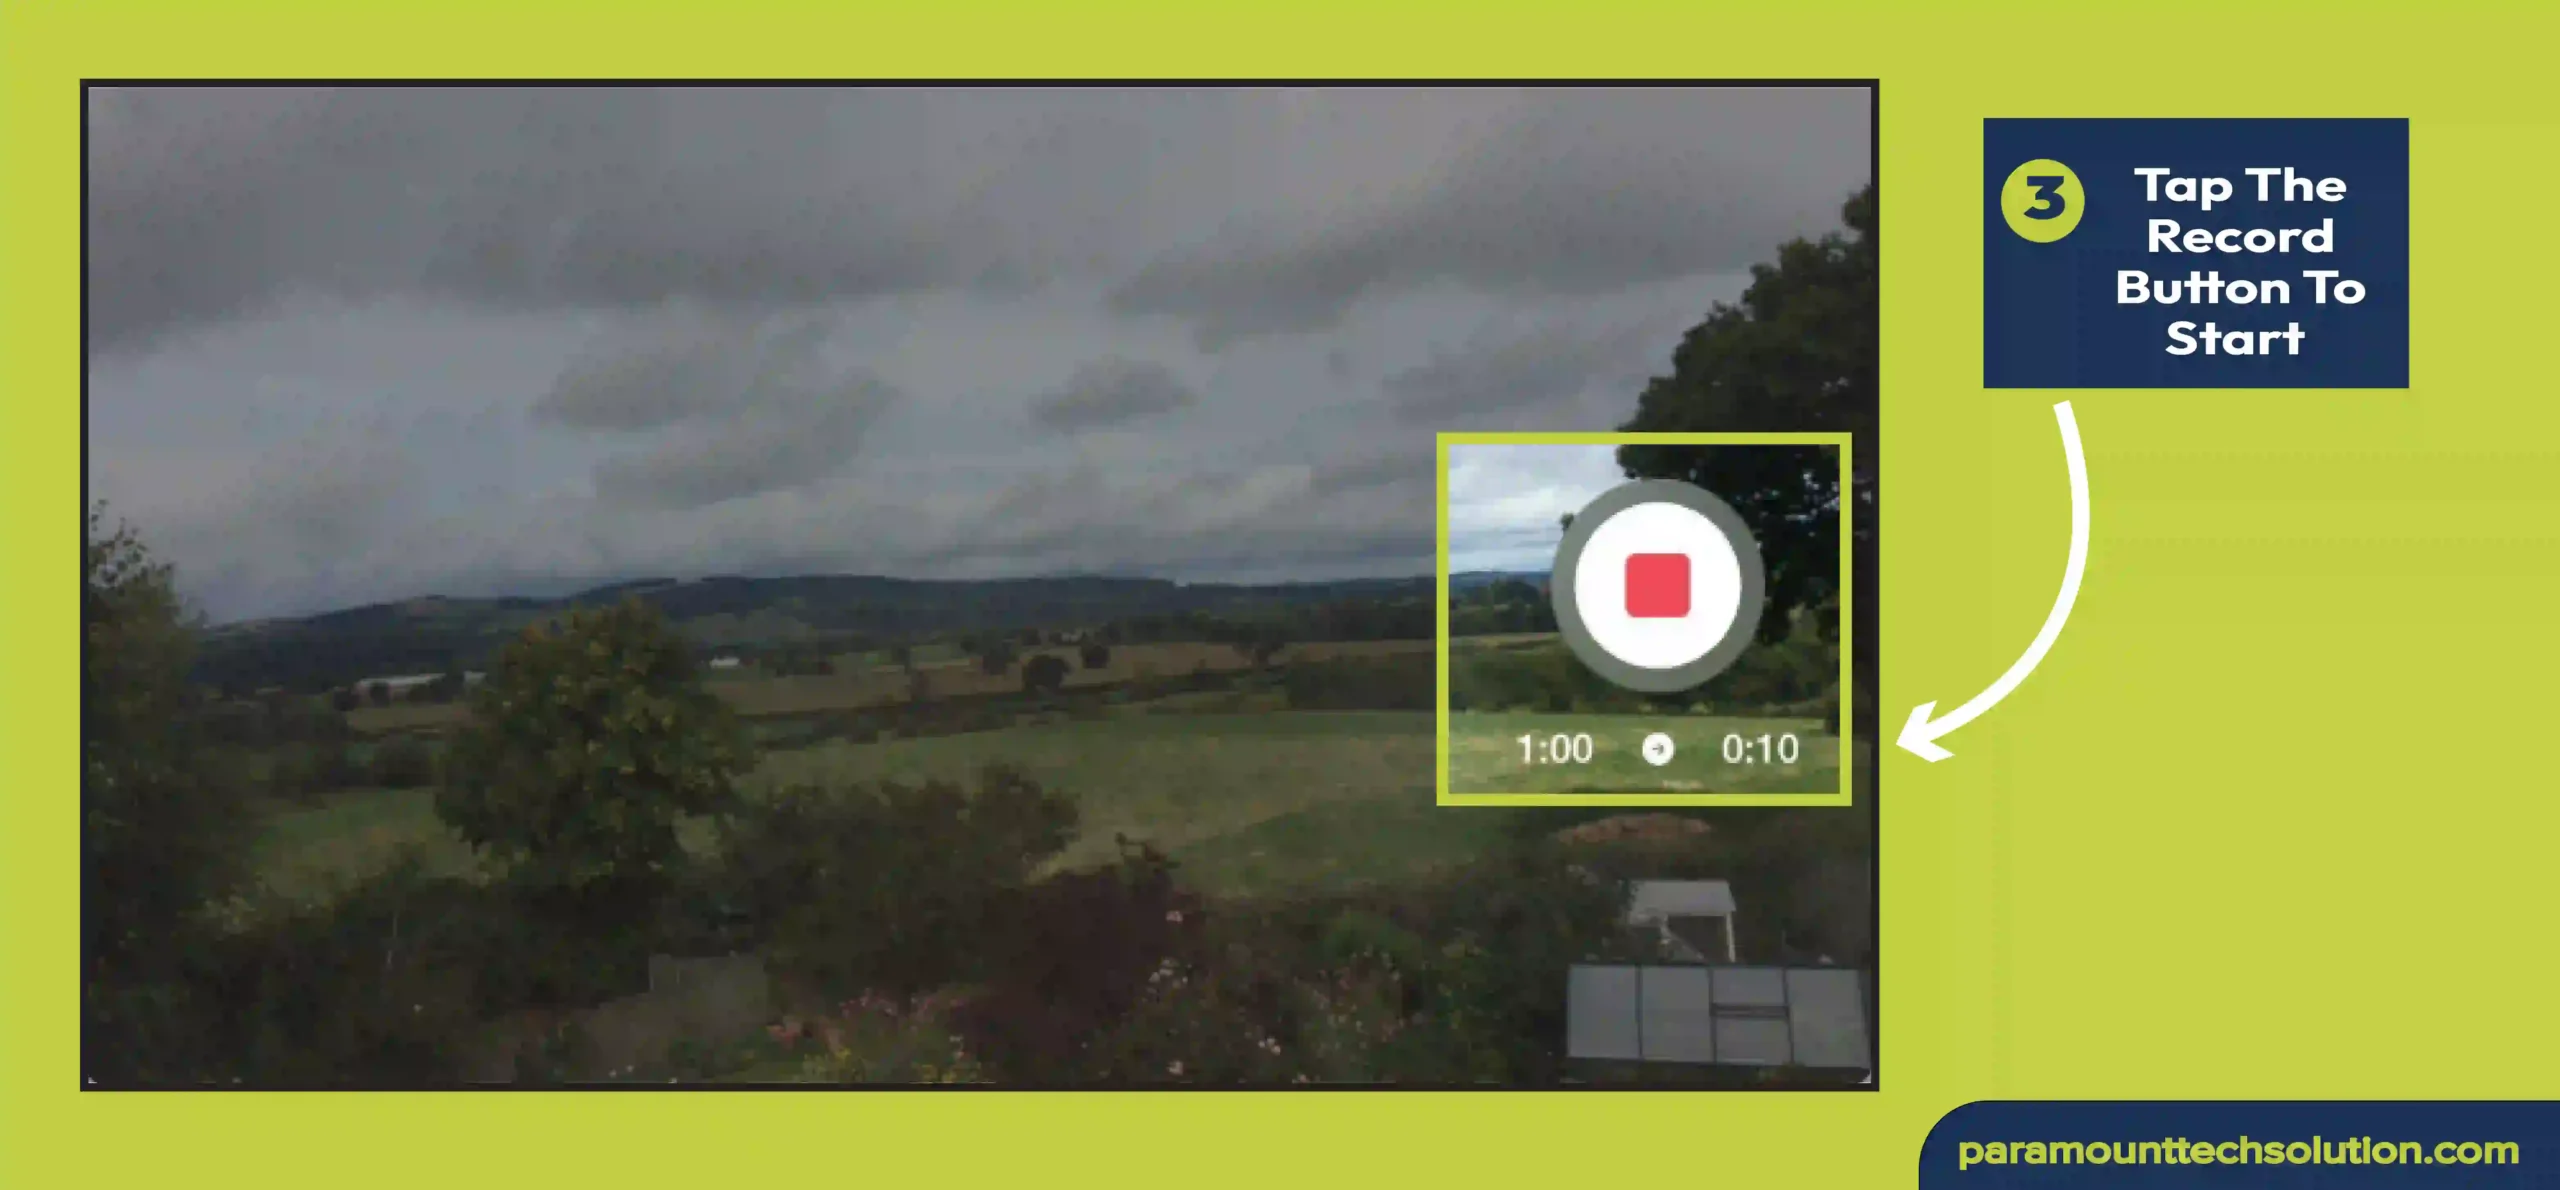
1.Open your iPhone camera 2.Switch modes by swiping left until you find and select ‘Time Lapse’ mode 3.Set up your phone for a still and stable recording 4.Tap on the subject of your recording to focus and highlight that area on the screen. 5.Tap the record button to start your timelapse video. 6.When you are finished click on the record button again to stop recording.
Additional Tips
Use an iPhone stand for recording with better stability
Try capturing events that take place over a long period like sunset, sunrise, meteor shower, or clouds-moving.
Focus on a subject using AE/AF Lock for a consistent and more detailed look throughout the video Try editing your time-lapse for a more refined final cut.
In such videos, the frames are automatically selected. And the final time lapse camera video is no longer than 40 seconds. You can opt for third-party apps for a more expansive set of features.
Third-party iPhone Camera Timer apps
iPhone Pic timer comes with some limitations, so if you are looking to be more creative in your artistic expression, try using these applications: