If you plan on making some quality content and do not know how to screen record on Mac? Fret not, we will be discussing how screen record Mac process takes place with a bundle of options for you to choose from.
Screen recording Mac is a great option for high-resolution gameplays, tutorials, business meetings, and online lectures. Mac offers indistinguishable video quality and ease of use for its users. You also need not worry about installing any fishy third-party screen recorders because Mac has its own powerful privacy and security layers for your peace of mind. Mac Screen Recording is saved as a .mov file which is freely compatible with macOS Ecosystem.
Screen Recording on Mac using Chromebook Keyboard
Chromebook keys are the quickest way to start screen recording on Mac. You can use the built-in screenshot toolbar to capture screen recordings if you are running a Mojave OS or any latest Mac version.
Here is how you to use these keys:
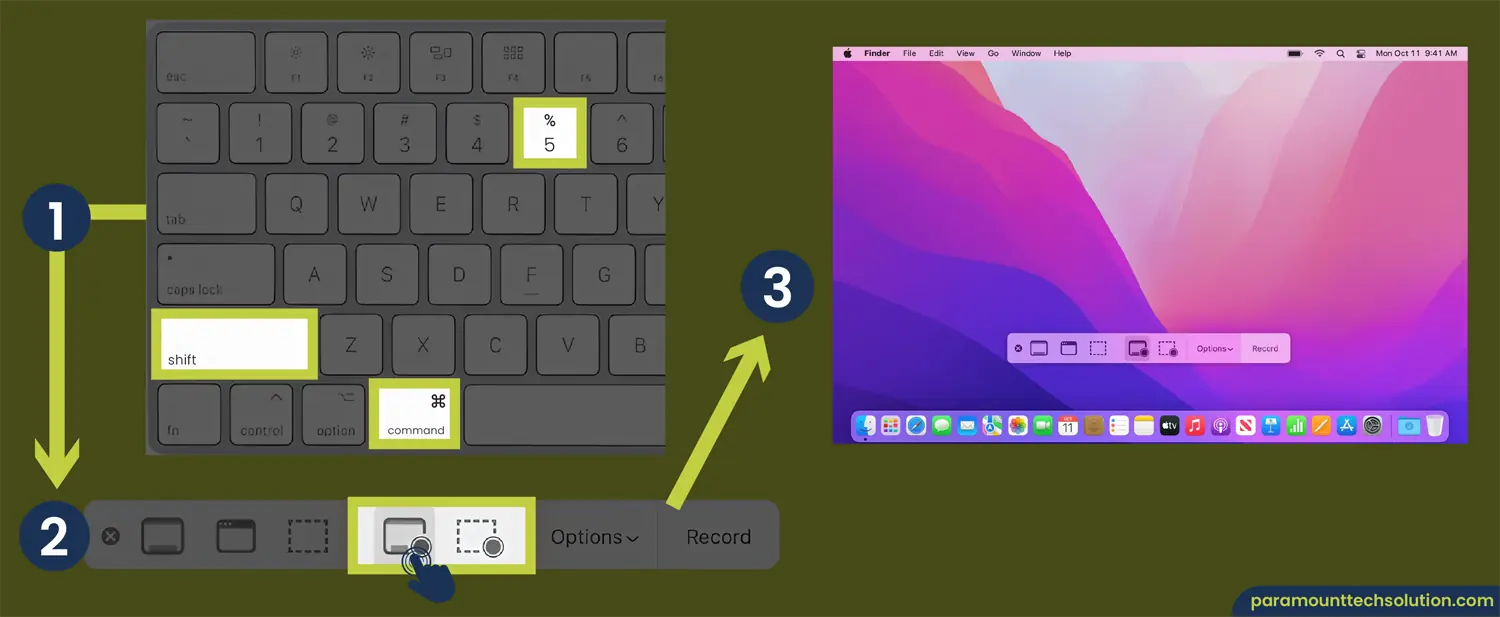
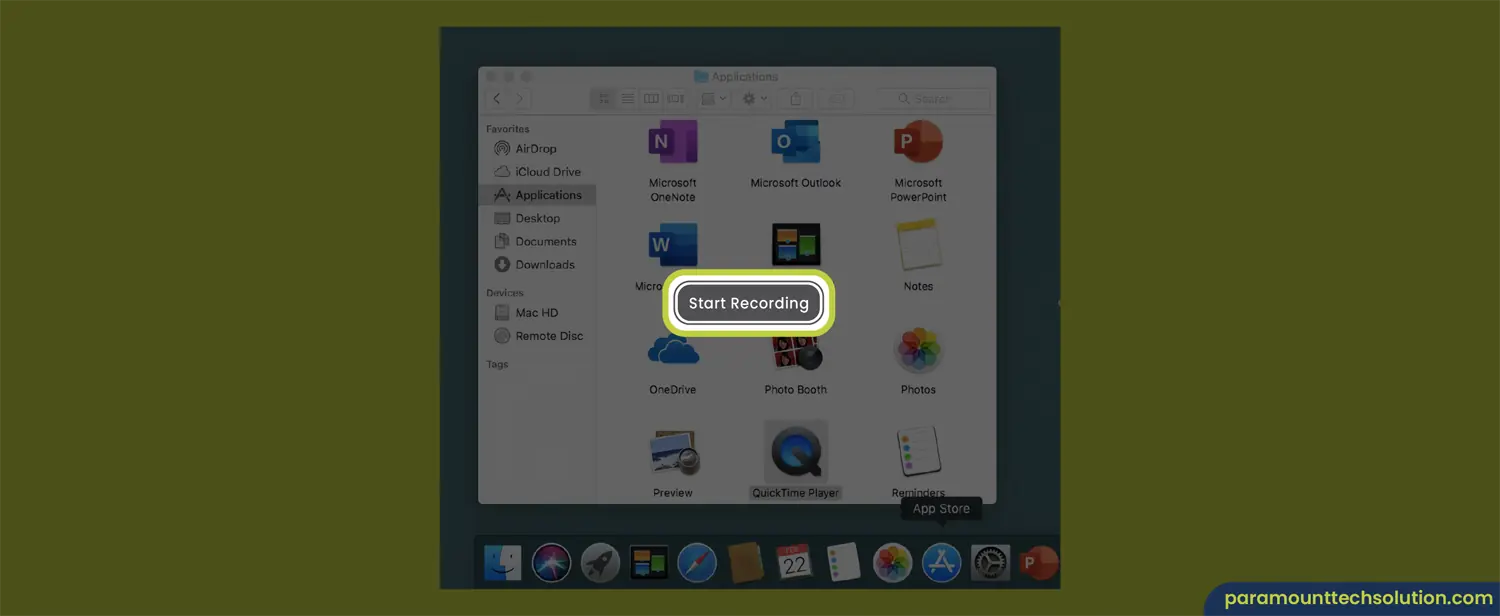
1: Go to the window you want to record, Press and hold “Shift + Command + 5” to open to screenshot toolbar.
2: Click on the left icon to record an entire screen, and the right one to record a part of your screen/window.
3: If you wish to record a portion of a window or screen, drag your mouse to indicate that specific area, and click “Record”.
4: Once you are finished, click on the “Stop” button from the menu bar. Or you can use “Command + Ctrl + Esc”.
Advantages This method is highly customizable and free as it comes built-in with the Mac operating system. You can freely choose a frame size, record delays, add music and commentary, and much more.
Limitations But just like all other default features, this one also comes with some limitations. Like basic editing tasks & no auto-scheduling. Remember there are limited export options (only .mov files), and you might need to convert your recordings in other formats to .mov files.
How to Screen Record on Mac Using Shortcuts?
You can also use these screen record shortcuts:
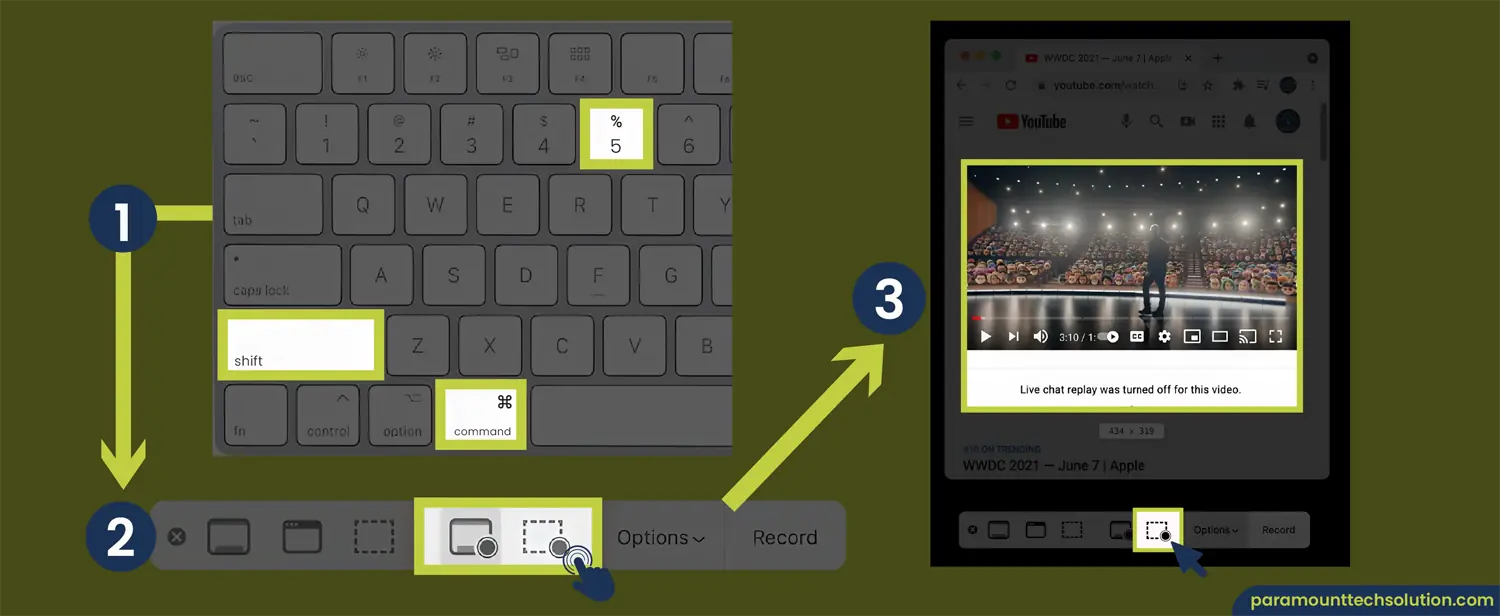
Command Shift 4 for recording a portion of the Video screen capture Mac. Use your mouse to identify a selected area.
Command Shift 4 + Space for selecting and recording an entire window
QuickTime Screen Recording With Audio
For lectures and presentations, where audio is a must for visual communication, the best way for you is to use Mac’s built-in QuickTime player.
Here is how to enable QuickTime player screen recording with audio:
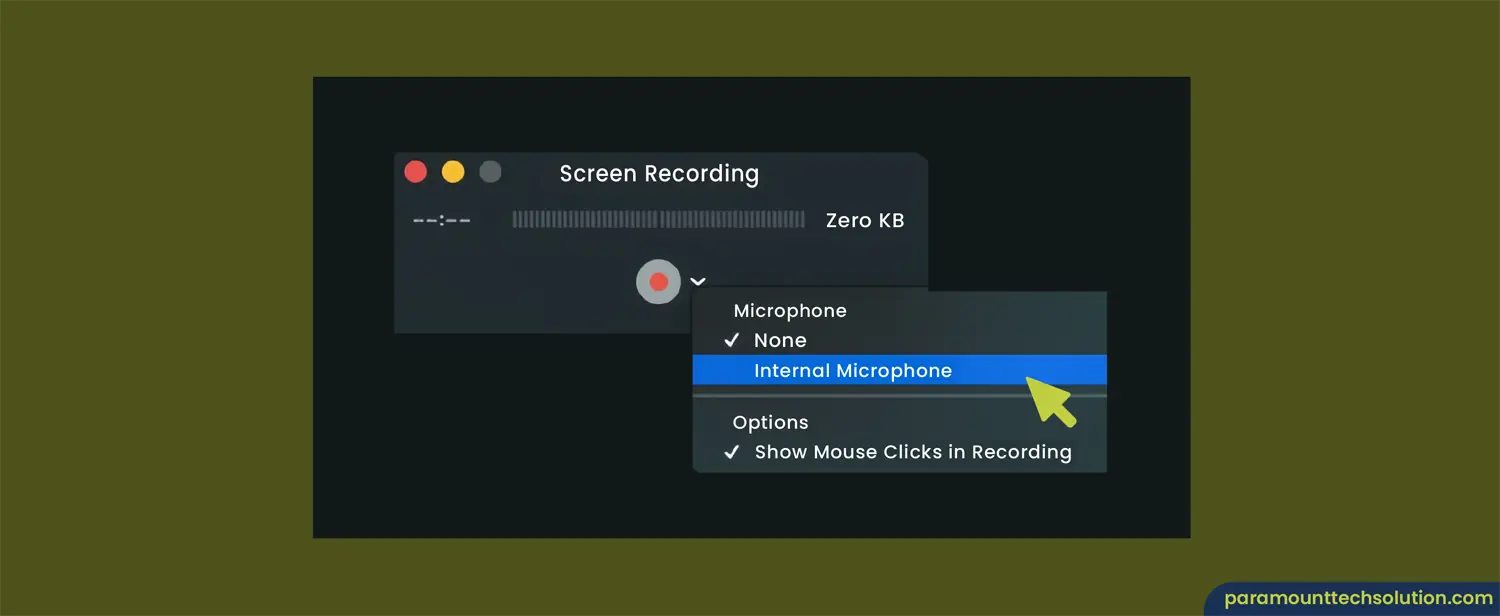
1: Open the QuickTime Player from your Mac. Go to your menu bar and under ‘File’, click on “New Screen Recording”.
2: Just beside the red “Record” button, there is a drop-down arrow. You can choose your desired audio input from those drop-down options.
3: To record your entire screen, just click anywhere on your screen after you hit the “Record” button. To record a portion of your Mac screen, just drag the mouse to indicate a specific area and click “Start Recording”. Now you have started QuickTime screen recording.
4: To stop QuickTime screen recording, just click the “Stop” button or press and hold “Command Ctrl Esc”.
QuickTime Player’s Screen capture with audio Mac has some advantages and limitations are the same as those of using a screenshot toolbar.
This recorder comes in handy even with older versions of the Mac, yet this usefulness is followed by a few limitations such as no options for delayed Record timer, or customizations.
Alternative Third-Party Screen Recorders for Mac
If you are looking to find more ways of how to record video on Mac or get more creative with your screen recordings, we recommend using a third-party software that offers way more features and customizations than Mac’s default apps.
Just be careful when installing any additional software and be wary of unwanted programs.
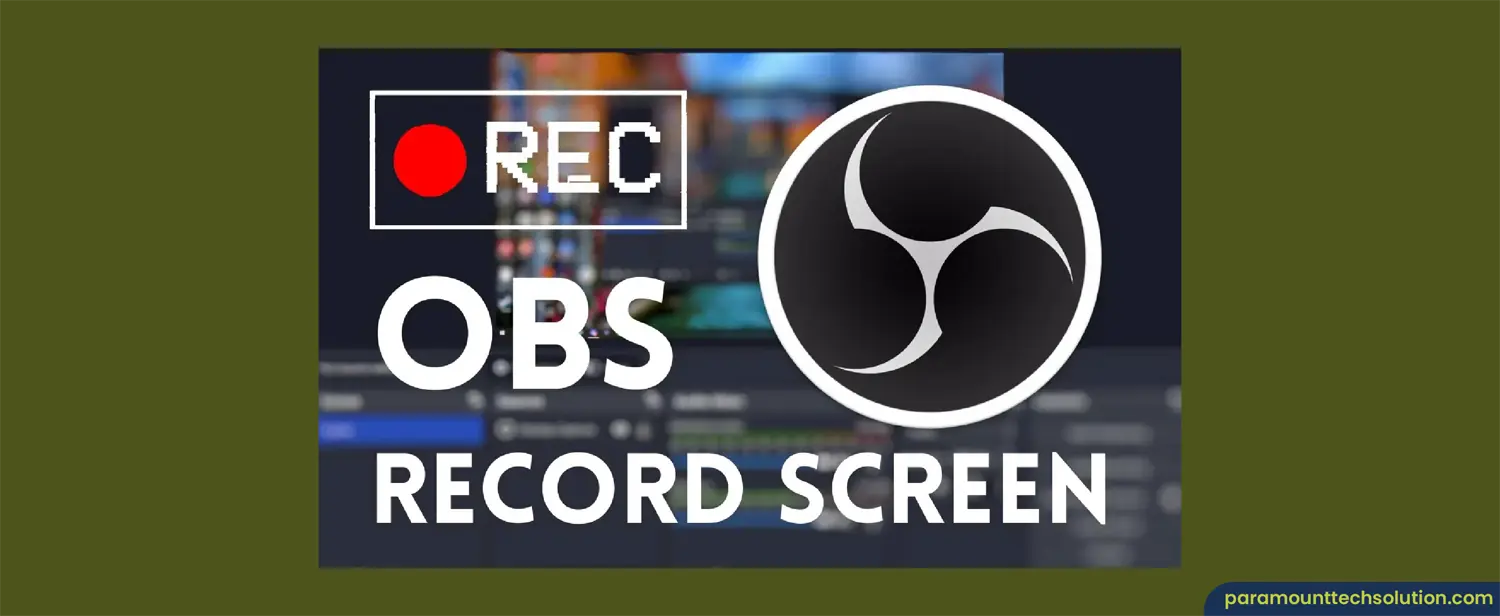
OBS Screen Recorder
OBS studio screen recorder is a great option for professional and business tasks and live streaming gameplays.
Obs screen record offers completely free features and is an open-source software. It is a Screen capture software for Mac offering a plethora of tools and audio/video features for you to choose from. You can opt for various input methods for audio and video recording formats—conversion options for transitioning between different file formats such as .mov to MP4 files, and much more. It even has features to record video webcam for your Mac. OBS camera can Record webcam and your screen simultaneously with the OBS studio.
Just like any other software, OBS screen recording comes with some drawbacks like a complex that comes with a steep learning curve and no editing capabilities for OBS record screen editing. Plus OBS Mac demands a little too much system requirements for its installation.
Loom
The Loom screen recorder is a cloud-based free screen recorder for Mac. This means you can get the Loom Chrome extension on your Mac browser and get started right away. It’s pretty convenient and easy to use. It doesn’t fill up your storage with unwanted loom videos and your recordings are stored on “My Library”. Or if you have any favorites, you can easily download Loom video.
You can get the Loom Desktop app for your Mac from Loom’s official website or get the Loom Chrome extension from the Chrome web store.
This Free screen recorder Mac also has some limitations like:
Possibility of crashing during an audio recording
Consistent internet connection throughout the recording process for a good recording
The trial version offers limited features
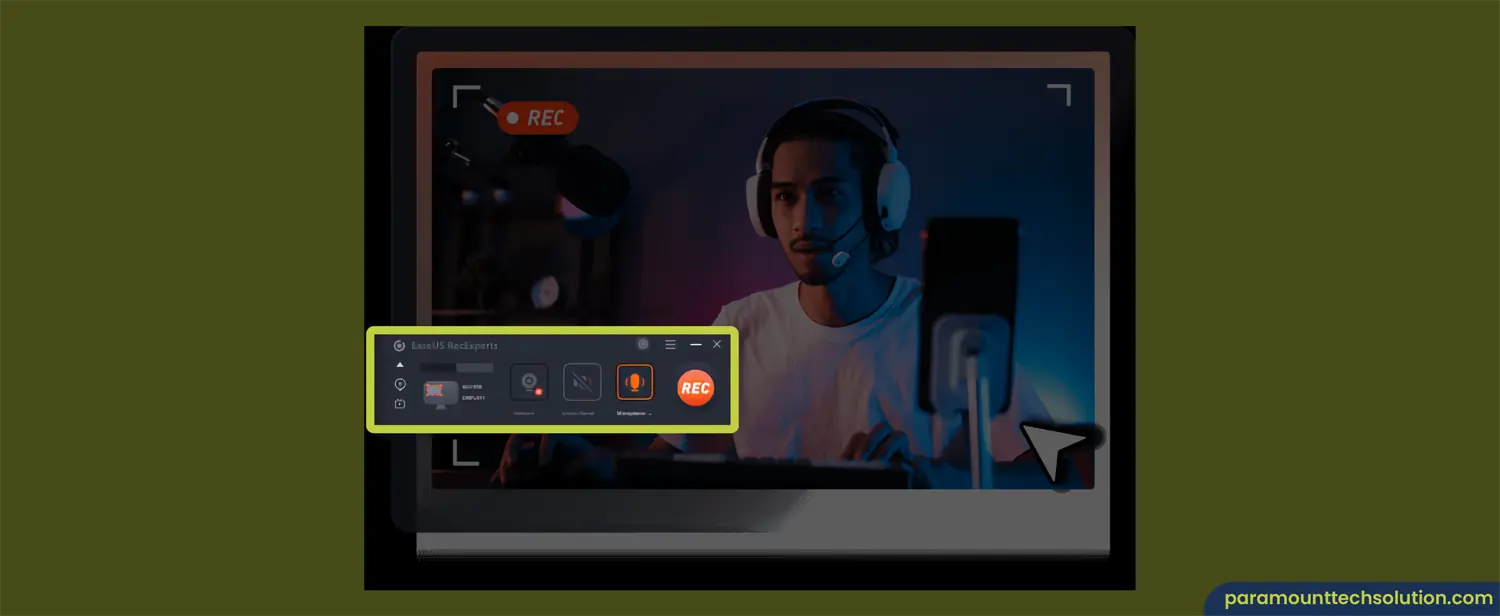
EaseUS RecExperts
EaseUS screen recorder is a fantastic option for Mac as it possesses a bunch of features that are free and unlimited to use.
Let us assess a brief EaseUS RecExperts review and what features can you enjoy for free:
EaseUS recorder allows screen record on mac with audio.
Mac Record screen and Audio simultaneously
Webcam recording software with an overlay
Screen recording high quality with download options
Automatically removes background noise
Perfect for gaming livestreams and converting audio to desired formats
More freedom to edit videos on Mac than any other free recorder
FAQs
How to stop QuickTime screen recording?
It’s simple as pie. Just when you feel like you should stop QuickTime screen recording, click the “Stop Recording” button. Or you can use the QuickTime Player keyboard shortcuts like “Ctrl + Command + Esc”. You can also choose this to save as keyboard shortcut for start and stop recordings, just like speed dial.
How to edit Screen recordings on Mac?
The quickest and readily available method is to use QuickTime Video Editor. Follow these steps to edit screen recordings on Mac:
Open the Video Editing Software QuickTime on your Mac Select File > Open File Select and open the video you wish to edit Click Edit > Trim Drag the yellow ends of the recording to trim the recording to your desired length Click on ‘Trim’ to confirm changes
What does OBS stand for?
OBS meaning stands for “Open Broadcaster Software” which is a free, open-source screen recording software for all operating systems, including an OBS for Mac.
You can broadcast your OBS screen recording, audio, and webcam on several streaming platforms like YouTube and Twitch.
What are Mac Keystroke Screen Capture shortcuts for recordings?
You can use some of these keyboard shortcuts for screen recording on Mac:
Command Shift 4 for selecting a portion of your screen to record
Command Shift 5 for opening up the default screenshot toolbar, from where you can choose to screenshot or screen record
Command Ctrl Esc to stop your screen recording at any given moment
Where do Screen Recordings go on Mac?
Screen recordings on Mac get readily saved on your desktop folder via Screenshot Toolbar. These recordings are exported as .mov files. You can choose to change the directory to where your recordings go, by clicking on ‘Options’ while recording.